Want to
learn
how to
make
$100 to
$1,000
for as
little as
fifteen
minutes
of work
trading
FOREX
with only
tiny
risks?
And do
this
multiple
times a
week?

Sound too good to be true?

Let's me explain

Right Now!

Introduction

Monday, April 26, 2010

You can trade for a living.

Really. You can.


The question people ask me most often is, not surprisingly, “Can I be successful at this?” Mostly, they ask me the question after a devastating loss. It’s a natural time to ask the question, but it’s a horrible time to answer it yourself.

Why? Because you can be successful, and every time you start to feel depressed about losing, you stop believing in yourself. If you stop believing in yourself, you stop working as hard, and if you stop working as hard, you start to make more mistakes, and a vicious cycle begins. Losses bring depression which brings more losses, and then before you know it you’ve lost your entire first account.

You don’t have to trade that way. There is a better way to trade.

I trade currency for a living, and so can you. Maybe it will take you more than a year to become successful. Maybe more. But you can do it. You don’t have to be better than most people at math. You don’t have to score high on an IQ test. You don’t have to be the smartest person you know.

You just have to be disciplined.

The Hard Way

I learned how to trade the hard way. By losing. Over and over. Think of a stupid mistake that traders make: I made that one. Think of another one: I made that one too. Only by keeping excellent records, staying determined, and learning from my mistakes was I able to being to trade profitably on a consistent basis. But along the way I learned that if you would rather flush your profits down the toilet, you should do the following things:
  1. Trade as much as possible. Trade all the time.
  2. Never close a losing trade.
  3. Always close a winning trade as quickly as possible.
  4. Never test a trading system. Trade it live ASAP - (As Soon As Possible).
  5. Fund your first live account with all of your savings.
  6. Fear: losing, winning, trying, failing, and succeeding.
  7. Ignore the trend.
  8. Don’t ask someone better than you for help.
Anyway, you get the idea. I did all of this stuff, and much more. Boy, I was really stupid. But that is all over now. Once I turned the corner to profitability, I never looked back.

The Basics

Before we get into specifics, I want to make sure you have a basic knowledge of currency trading. You might want to skip introduction section if you know what a pip is, how margin works, and that kind of stuff.

Good luck and happy learning and trading in Marketiva,

Chikou Span Cross

Sunday, April 25, 2010
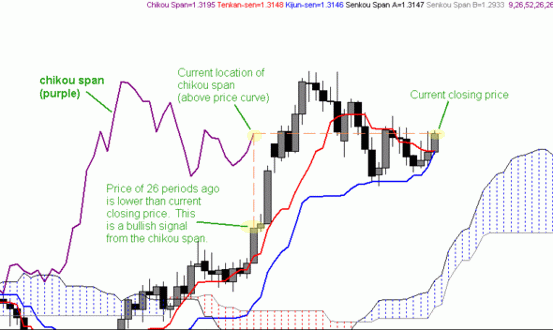
For those that have been using the Ichimoku Kinko Hyo charting system for any length of time, utilizing the chikou span cross strategy should be like second nature. Why? Because the chikou span cross is essentially the "chikou span confirmation" that savvy Ichimoku traders utilize to confirm chart sentiment before entering any trade. This confirmation comes in the form of the chikou span crossing through the price curve in the direction of the proposed trade. If it crosses through the price curve from the bottom up, then it is a bullish signal. If it crosses from the top down, then it is considered a bearish signal.

Thus, we already know the power of the chikou span cross via its use as a confirmation strategy. However, when used within some simple guidelines, the chikou span cross can be used as its own standalone trading strategy with very good success.

Like many other Ichimoku trading strategies, the chikou span cross strategy uses price's relationship to the kumo to categorize its signals into three (3) major classifications: strong, neutral and weak.
STRONG CHIKOU SPAN CROSS SIGNAL

A strong chikou span cross Buy signal takes place when a bullish cross takes place and current price is above the kumo

A strong chikou span cross Sell signal takes place when a bearish cross takes place and current price is below the kumo.

NEUTRAL CHIKOU SPAN CROSS SIGNAL

A neutral chikou span cross Buy signal takes place when a bullish cross takes place and current price is within the kumo

A neutral chikou span cross Sell signal takes place when a bearish cross takes place and current price is within the kumo.

WEAK CHIKOU SPAN CROSS SIGNAL

A weak chikou span cross Buy signal takes place when a bullish cross takes place and current price is below the kumo

A weak chikou span cross Sell signal takes place when a bearish cross takes place and current price is above the kumo.
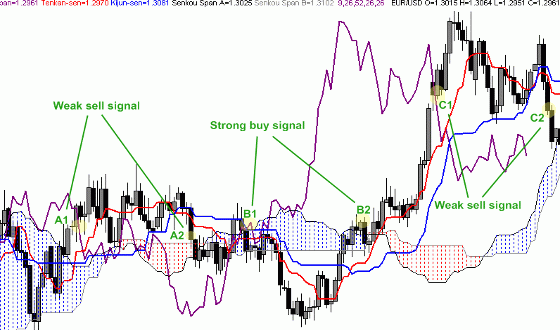
The chart in Figure IX below provides several examples of the chikou span cross. Given the fact that the chikou span is a measure of closing price shifted 26 periods into the past, we must always keep in mind both the location of the chikou span in relation to the price curve (the "cross" itself) and the current candle and its relation to the kumo. Thus, Point A1 is the point where the chikou span crossed the price curve downward and Point A2 is the closing candle that initiated that bearish cross. However, since the candle at Point A2 was above the prevailing kumo at the point of the cross, this particular signal would be categorized as a "weak" bearish cross. A strong bullish cross can be seen in Points B1 and B2 since the chikou span crossed upward through the price curve and the closing candle at that point in time was above the prevailing kumo. Points C1 and C2 represent a weak bearish cross given that they transpired above the prevailing kumo.


Figure IX - Chikou Span Cross Classifications

Entry

The entry for the chikou span cross is relatively straightforward - the trader initiates a position in the direction of the chikou span cross after taking into consideration the cross's strength and other chart signals. For the highest probability of success, the trader will also look for the chikou span itself to be free of the kumo as the chikou span can often interact with the kumo much like the price curve.

Exit

The most traditional exit for a chikou span cross trade is generally signalled by a chikou span cross in the opposite direction of the trade, though other exit signals may be taken depending upon the trader's risk tolerance and profit goals.

Stop-Loss Placement

The chikou span strategy does not dictate use of any particular Ichimoku structure for stop-loss placement, like some other strategies do. Instead, the trader should consider their execution time frame and their money management rules and then look for the appropriate prevailing structure for setting their stop-loss.

Take Profit Targets

Take profit targetting for the chikou span cross strategy can be approached in one of two different ways. It can be approached from a day/swing trader perspective where take profit targets are set using key levels, or from a position trader perspective, where the trader does not set specific targets but rather waits for the current trend to be invalidated by a chikou span cross transpiring in the opposite direction of their trade.

Case Study

In the Daily chart in Figure X below for USD/CHF we can see a bullish chikou span cross at point A. However, while it is technically a strong cross, the chikou span is still below significant resistance provided by the two chikou span points at 1.2090. In addition, the tenkan sen and kijun sen are in a flat configuration which doesn't provide any additional confirmation. Thus we wait for a more convincing setup before entering Long. This is achieved five (5) days later at Point B1 when the chikou span moves back up through the price curve after a brief dip below. We wait for the daily candle to close and then enter long at 1.2164 at Point B2. Our confidence in this entry is increased by the bullish tenkan sen/kijun sen cross that has since transpired.

For our stop-loss, we consider the prevailing structures and decide to place it just below the kijun sen at 1.1956, since a cross below that point will not only have the chikou span executing a fresh bearish cross, but also have price executing a bearish kijun sen cross, both of which would invalidate our long position.


Figure X - Chikou Span Cross Case Study

Once we place our entry and stop-loss orders, we wait for the trade to unfold. Depending upon our trading style, we could opt to trail our stop-loss along with the kijun sen to keep a tighter rein on risk management or we could utilize the more traditional method of waiting for a chikou span cross in the opposite direction of our trade. In this case, a chikou span cross in the opposite direction takes place just under two months later (Point C1) at 1.2619 (Point C2) and we close out our trade for a gain of over 450 pips. It is worth noting that, even though the chikou span cross on its own would be considered technically "weak" due to its location above the kumo, it is bolstered by a bearish tenkan sen/kijun sen cross to form a bearish three-line pattern. Alternatively, if we had chosen to use the kijun sen as our trailing stop in this trade, instead of waiting for a chikou span cross, we would have exited somewhere around the 1.2735 level, which would have netted us over 560 pips.

Senkou Span Cross

The senkou span cross is one of the lesser known trading strategies within the Ichimoku Kinko Hyo system. This is mostly due to the fact that the senkou span cross tends to be more commonly used as an additional confirmation with other trading strategies rather than being used as a standalone trading strategy in its own right. However, it is nonetheless a solid trend trading strategy and can definitely be used on its own.

Given that the senkou span cross strategy, like the kumo breakout trading strategy, utilize the kumo for signal generation, it is best employed on the longer time frames of the Daily chart and above. The senkou span cross signal is given when the senkou span A line crosses over the senkou span B line of the kumo. If the senkou span A crosses the senkou span B from the bottom up, then it is a bullish signal. If it crosses from the top down, then it is a bearish signal. Nevertheless, like all trading strategies within the Ichimoku Kinko Hyo system, the senkou span cross signal needs to be evaluated against the larger Ichimoku "picture" before committing to any trade.

The thing to keep in mind with the senkou span cross strategy is that the "cross" signal will take place 26 periods ahead of the price action as the kumo is time-shifted 26 periods into the future. This relationship is obvious when one looks at the current price on a live chart, but less so when looking at historical price action. In addition, while all Ichimoku strategies should be exercised with the larger Ichimoku picture in mind, this is particularly important with the senkou span cross. Thus, determining the overall trend on higher time frames first and then taking only senkou span signals that align with that trend on the lower timeframes is the best implementation of the senkou span strategy.

In general, the senkou span cross strategy can be classified into three (3) major classifications: strong, neutral and weak.
STRONG SENKOU SPAN CROSS SIGNAL

A strong senkou span cross signal takes place when the price curve is on the side of the kumo that matches the sentiment of the senkou span cross.

NEUTRAL SENKOU SPAN CROSS SIGNAL

A neutral senkou span cross signal takes place when the price curve is inside the kumo at the time of the senkou span cross.

WEAK SENKOU SPAN CROSS SIGNAL

A weak senkou span cross signal takes place when the price curve is on the opposite side of the kumo that matches the sentiment of the senkou span cross.
The chart in Figure VII below shows some classifications of the senkou span cross. The dashed vertical lines represent the 26-period relationship between price and the senkou span cross. Thus, point A represents a bullish senkou span cross that can be categorized as a "strong" buy signal due to the fact that price (point B), at the point of the cross, was trading above the kumo. Likewise, point C represents a bearish senkou span cross that generated a strong sell signal due to price's location at point D below the kumo. The senkou span cross at Point E generated a neutral buy signal since price (point F) was trading within the kumo at that point.


Figure VII - Senkou Span Cross Classifications

Entry

The entry for the senkou span cross trading strategy is relatively simple, though, as mentioned above, entries do require even more attention to the overall trend on higher time frames before executing any trades. After determining the trend on the higher time frames, the trader looks for a fresh senkou span cross in the same direction as the overall trend that has been solidified by a close on the execution time frame. Once they identify a suitable opportunity, they initiate a position in the direction of the senkou span sentiment. As in all Ichimoku trading strategies, traders will be well-advised to consider the relative strength of the cross (vis-a-vis price's location relative to the kumo) as well as the sentiment provided by the remaining Ichimoku components at the time of the cross in order to ensure the most optimum entry.

It is worth mentioning here that the strong bull (buy) signal outlined in our first chart that took place in April of 2005, while technically strong from a 1D perspective, was not aligned with the overall downtrend in-place on the Weekly and Monthly charts. Thus, traders taking this trade signal and using a senkou span cross in the opposite direction as their exit signal would have actually lost pips. This underscores the importance of evaluating sentiment on multiple time frames and trading with the overall trend.

Exit

The exit from a senkou span cross trade is generally signalled by a senkou span cross in the opposite direction of the trade, though other exit signals may be taken depending upon the trader's risk tolerance and profit goals.

Stop-Loss Placement

Being a "big picture" trend trading strategy like the kumo breakout strategy, the stop-loss for the senkou span cross strategy is placed on the opposite side of the kumo that the trade is transpiring on, 10 - 20 pips away from the kumo boundary.

Take Profit Targets

While traditional take profit targets can be used with the senkou span cross trading strategy, it is more in-line with the long-term trend trading approach to wait for a senkou span cross to transpire in the opposite direction of the trade before closing out the position. This method allows the trade to take full advantage of the trend without closing the trade until price action dictates unequivocally that the trend is over.

Case Study

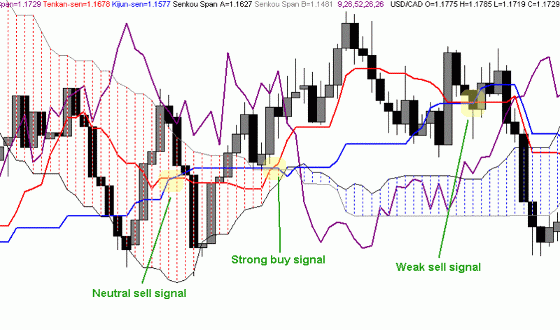
In the Daily chart in Figure VIII below for USD/CAD we can see a bearish senkou span cross at point A. This cross corresponds to the candle at point B. Since the candle closed just below the kumo, the signal is considered a strong one given that its sentiment agrees with the sentiment of the bearish senkou span cross. In addition, we confirm that the direction of this signal is aligned with the overall downtrend in-place on the Weekly and Monthly time frames, so we know that we are trading with the trend. Nevertheless, we are wary of the flat bottom kumo just to the right of the candle, which could act as an attractor for price, so we look for a conservative entry point that will ensure we will not get caught in any false breakouts. The last chikou span support at 1.2292 looks like a good anchor point for assuring this. Price closes below this point a couple of days later at 1.2290 and we enter short at point C.

For our stop-loss, we follow the kumo breakout guideline of placing it 10 - 20 pips away from the opposite side of the kumo where our trade is taking place. In this case, we place it 20 pips away from the top of the kumo above our entry candle at point D (1.2542).


Figure VIII - Senkou Span Cross Case Study

Once we place our entry and stop-loss orders, we wait for the trade to unfold while continually moving our stop-loss down with the prevailing kumo. In this case, a bit more than four months later, price ranging has created a fresh senkou span cross in the opposite direction of our trade at point E, corresponding to the candle at point F where we close out our trade at 1.1908, netting us over 380 pips in the process.

Kumo Breakout

Kumo Breakout trading or "Kumo Trading" is a trading strategy that can be used on multiple time frames, though it is most widely used on the higher time frames (e.g.: Daily, Weekly, Monthly) of the position trader. Kumo breakout trading is the purest form of trend trading offered by the Ichimoku charting system, as it looks solely to the kumo and price's relationship to it for its signals. It is "big picture" trading that focuses only on whether price is trading above or below the prevailing kumo. In a nutshell, the signal to go long in Kumo breakout trading is when price closes above the prevailing kumo and, likewise, the signal to go short is when price closes below the prevailing kumo.

See the chart in Figure V below for an example of a kumo breakout buy signal:


Figure V - Kumo Breakout Buy Signal

Entry 
 
The entry for the kumo breakout trading strategy is simple - when price closes above/below the kumo, the trader places a trade in the direction of the breakout. Nevertheless, care does need to be taken to ensure the breakout is not a "head fake" which can be especially prevalent when the breakout takes place from a flat top/bottom kumo. To ensure the flat top/bottom is not going to attract price back to the kumo, it is always advisable to look for another Ichimoku structure to "anchor" your entry to just above/below the kumo breakout. This anchor can be anything from a key level provided by the chikou span, a kumo shadow or any other appropriate structure that could act as additional support/resistance to solidify the direction and momentum of the trade.

Kumo breakout traders also make good use of the leading kumo's sentiment before committing to a trade. If the leading kumo is a Bear kumo and the kumo breakout is also Bear, then that is a very good sign that the breakout is not an aberration of excessive volatility, but rather a true indication of market sentiment. If the leading kumo contradicts the direction of the breakout, then the trader may want to either wait until the kumo does agree with the direction of the trade or use more conservative position sizing to account for the increased risk.

Exit

The exit from a kumo breakout trade is the easiest part of the whole trade. The trader merely waits for their stop-loss to get triggered as price exits the opposite side of the kumo on which the trade is transpiring. Since the trader has been steadily moving their stop-loss up with the kumo during the entire lifespan of the trade, this assures they maximize their profit and minimize their risk.

Stop-Loss Placement

Being a "big picture" trend trading strategy, the stop-loss for the kumo breakout strategy is placed at the point that the trend has been invalidated. Thus, the stop-loss for a kumo breakout trade must be placed on the opposite side of the kumo that the trade is transpiring on, 10 - 20 pips away from the kumo boundary. If price does manage to reach the point of the stop-loss, the trader can be relatively assured that a major trend change has taken place.


Take Profit Targets

While traditional take profit targets can be used with the kumo breakout trading strategy, it is more in-line with the long-term trend trading approach to simply move the stop-loss up/down with the kumo as it matures. This method allows the trade to take full advantage of the trend without closing the trade until price action dictates unequivocally that the trend is over.

Case Study

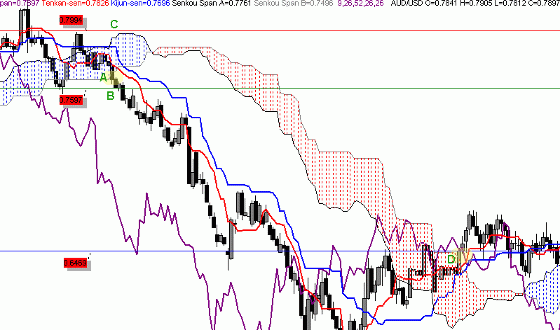
In the Weekly chart in Figure VI below for AUD/USD we can see a bearish kumo breakout taking place at point A. We also see that that leading kumo is distinctly bearish as well, which acts to confirm our breakout sentiment. Given that price is exiting from a flat-bottom kumo and that we want to reduce any risks of entering on a false breakout, we look for a close below the last chikou span support at .7600 before entering. The close we are looking for is achieved shortly thereafter at point B and we enter short.

For our stop-loss, we follow the kumo breakout guideline of placing it 10 - 20 pips away from the opposite side of the kumo where our breakout is taking place. In this case, we place it 20 pips away from the top of the kumo above our entry candle at point C (.7994).


Figure VI - Kumo Breakout Case Study

Once we place our entry and stop-loss orders, we merely wait for the trade to unfold while continually moving our stop-loss down with the prevailing kumo. Given that we are using the Weekly chart as our execution time frame, we prepare ourselves for a very long-term trade. In this case, nearly two years later, price rises enough to break out of the kumo to the other side, where it triggers our buy order some 20 pips away at point D netting us over 1100 pips in the process.

Kijun Sen Cross

The kijun sen cross is one of the most powerful and reliable trading strategies within the Ichimoku Kinko Hyo system. It can be used on nearly all time frames with excellent results, though it will be somewhat less reliable on the lower, daytrading time frames due to the increased volatility on those time frames. The kijun sen cross signal is given when price crosses over the kijun sen. If it crosses the price curve from the bottom up, then it is a bullish signal. If it crosses from the top down, then it is a bearish signal. Nevertheless, like all trading strategies within the Ichimoku Kinko Hyo system, the kijun sen cross signal needs to be evaluated against the larger Ichimoku "picture" before committing to any trade.

In general, the kijun sen cross strategy can be classified into three (3) major classifications: strong, neutral and weak.
STRONG KIJUN SEN CROSS SIGNAL

A strong kijun sen cross Buy signal takes place when a bullish cross happens above the kumo.

A strong kijun sen cross Sell signal takes place when a bearish cross happens below the kumo.

NEUTRAL KIJUN SEN CROSS SIGNAL

A neutral kijun sen cross Buy signal takes place when a bullish cross happens within the kumo.

A neutral kijun sen cross Sell signal takes place when a bearish cross happens within the kumo.

WEAK KIJUN SEN CROSS SIGNAL

A weak kijun sen cross Buy signal takes place when a bullish cross happens below the kumo.

A weak kijun sen cross Sell signal takes place when a bearish cross happens above the kumo.
See the chart in Figure III below for an example of several classifications of the kijun sen cross:


Figure III - Kijun Sen Cross Classifications
Chikou span confirmation

As with the tenkan sen/kijun sen cross strategy, the savvy Ichimoku trader will make good use of the chikou span to confirm any kijun sen cross signal. Each of the three classifications of the kijun sen cross outlined above can be further classified based on the chikou span's location in relation to the price curve at the time of the cross. If the cross is a "Buy" signal and the chikou span is above the price curve at that point in time, this will add greater strength to that buy signal. Likewise, if the cross is a "Sell" signal and the chikou span is below the price curve at that point in time, this will provide additional confirmation to that signal. If the chikou span's location in relation to the price curve is the opposite of the kijun sen cross's sentiment, then that will weaken the signal.

Entry

The entry for the kijun sen cross is very straightforward - an order is placed in the direction of the cross once the cross has been solidified by a close. Nevertheless, in accordance with good Ichimoku trading practices, the trader should bear in mind any significant levels of support/resistance near the cross and consider getting a close above those levels before executing their order.

Exit

A trader exits a kijun sen cross trade upon their stop-loss getting triggered when price crossing the kijun sen in the opposite direction of their trade. Thus, it is key that the trader move their stop-loss in lockstep with the movement of the kijun sen in order to maximize their profit.

Stop-Loss Placement

The kijun sen cross strategy is unique among Ichimoku strategies in that the trader's stop-loss is determined and managed by the kijun sen itself. This is due to the kijun sen's strong representation of price equilibrium, which makes it an excellent determinant of sentiment. Thus, if price retraces back below the kijun sen after executing a bullish kijun sen cross, then that is a good indication that insufficient momentum is present to further the nascent bullish sentiment.

When entering a trade upon a kijun sen cross, the trader will review the current value of the kijun sen and place their stop-loss 5 to 10 pips on the opposite side of the kijun sen that their entry is placed on. The exact number of pips for the stop-loss "buffer" above/below the kijun sen will depend upon the dynamics of the pair and price's historical behavior vis-a-vis the kijun sen as well as the risk tolerance of the individual trader, but 5 to 10 pips should be appropriate for most situations. When looking to enter Short, the trader will look to place their stop-loss just above the current kijun sen and when looking to enter Long, the trader will place their stop-loss just below the current kijun sen.

Once the trade is underway, the trader should move their stop-loss up/down with the movement of the kijun sen, always maintaining the 5 to 10 pip "buffer". In this way, the kijun sen itself acts as a "trailing stop-loss" of sorts and enables the trader to keep a tight hold on risk management while maximizing profits.

Take Profit Targets

Take profit targetting for the kijun sen cross strategy can be approached in one of two different ways. It can be approached from a day/swing trader perspective where take profit targets are set using key levels, or from a position trader perspective, where the trader does not set specific targets but rather waits for the current trend to be invalidated by price crossing back over the kijun sen in the opposite direction of their trade.

Case Study

In the 1D chart in Figure IV below for USD/CHF we can see a bullish kijun sen cross at point A. While the initial cross is above the kumo and therefore a relatively strong cross, it is still beneath a very key chikou span level (not visible on this chart), so we wait until we get a close above that key level before entering at point B. At this point, we also have the additional benefit of confirmation from a bullish tenkan sen/kijun sen cross and a nice upward angle to the kijun sen, bolstering our prospects for more bullish price action even more. For our stop-loss, we follow the kijun sen trading strategy guidelines and place it 10 pips below the prevailing kijun sen at point C.


Figure IV - Kijun Sen Cross Case Study

Once we place our entry and stop-loss orders, we merely wait for the trade to unfold while continually moving up our stop-loss with the kijun sen. Price rises nicely for the next 40 days staying well above the kijun sen. After this point, price begins to drop and, on the 44th day, price crosses the kijun sen and hits our stop-loss at point D closing out our trade and netting us a profit of 645 pips.

Tenkan Sen / Kijun Sen Cross

The tenkan sen/kijun sen cross is one of the most traditional trading strategies within the Ichimoku Kinko Hyo system. The signal for this strategy is given when the tenkan sen crosses over the kijun sen. If the tenkan sen crosses above the kijun sen, then it is a bullish signal. Likewise, if the tenkan sen crosses below the kijun sen, then that is a bearish signal. Like all strategies within the Ichimoku system, the tenkan sen/kijun sen cross needs to be viewed in terms of the bigger Ichimoku picture before making any trading decisions, as this will give the strategy the best chances of success.

In general, the tenkan sen/kijun sen strategy can be classified into three major classifications: strong, neutral and weak.
STRONG TENKAN SEN/KIJUN SEN CROSS SIGNAL

A strong tenkan sen/kijun sen cross Buy signal takes place when a bullish cross happens above the kumo.

A strong tenkan sen/kijun sen cross Sell signal takes place when a bearish cross happens below the kumo.

NEUTRAL TENKAN SEN/KIJUN SEN CROSS SIGNAL

A neutral tenkan sen/kijun sen cross Buy signal takes place when a bullish cross happens within the kumo.

A neutral tenkan sen/kijun sen cross Sell signal takes place when a bearish cross happens within the kumo.

WEAK TENKAN SEN/KIJUN SEN CROSS SIGNAL

A weak tenkan sen/kijun sen cross Buy signal takes place when a bullish cross happens below the kumo.

A weak tenkan sen/kijun sen cross Sell signal takes place when a bearish cross happens above the kumo.

See the chart in Figure I below for an example of several classifications of the tenkan sen/kijun sen cross:


Figure I - Tenkan Sen/Kijun Sen Cross Classifications

But wait! Have you checked the chikou span?

With these three major classifications in mind, we will add something else into the equation - the chikou span. As we explained in the section detailing the chikou span, this component acts as a "final arbiter" of sentiment and should be consulted with every single trading signal in the Ichimiku Kinko Hyo charting system. The tenkan sen/kijun sen cross is no different. Each of the three classifications of the tenkan sen/kijun sen cross mentioned above can be further classified based on the chikou span's location in relation to the price curve at the time of the cross. If the cross is a "Buy" signal and the chikou span is above the price curve at that point in time, this will add greater strength to that buy signal. Likewise, if the cross is a "Sell" signal and the chikou span is below the price curve at that point in time, this will provide additional confirmation to that signal. If the chikou span's location in relation to the price curve is the opposite of the tenkan sen/kijun sen cross's sentiment, then that will weaken the signal.

Entry

The entry for the tenkan sen/kijun sen cross is very straightforward - an order is placed in the direction of the cross once the cross has been solidified by a close. Nevertheless, in accordance with good Ichimoku trading practices, the trader should bear in mind any significant levels of support/resistance near the cross and consider getting a close above those levels before executing their order.

Exit

The exit from a tenkan sen/kijun sen cross will vary with the particular circumstances of the chart. The most traditional exit signal is a tenkan sen/kijun sen cross in the opposite direction of your trade. However, personal risk management and time frame concerns may dictate an earlier exit, or an exit based upon other Ichimoku signals, just as in any other trade.

Stop-Loss Placement

The tenkan sen/kijun sen strategy does not dictate use of any particular Ichimoku structure for stop-loss placement, like some other strategies do. Instead, the trader should consider their execution time frame and their money management rules and then look for the appropriate prevailing structure for setting their stop-loss.

Take Profit Targets

Take profit targetting for the tenkan sen/kijun sen cross strategy can be approached in one of two different ways. It can be approached from a day/swing trader perspective where take profit targets are set using key levels, or from a position trader perspective, where the trader does not set specific targets but rather waits for the current trend to be invalidated by a tenkan sen/kijun sen cross transpiring in the opposite direction of their trade.

Case Study

In the 4H chart in Figure II below we can see a bullish tenkan sen/kijun sen cross at point A. Since this cross took place within the kumo itself, it is considered a "neutral" buy signal, thus we wait for price to exit and close above the kumo to confirm this sentiment before placing our long entry. Price does achieve a close above the kumo at point B (1.5918) and we place our long entry at that point. For our stop-loss, we look for the place where our trade sentiment would be invalidated. In this case, the bottom edge of the kumo provides us with just that at point C (1.5872).

Once we place our entry and stop-loss orders, we merely wait for the trade to unfold while keeping an eye out for potential exit signals. Price rises nicely for the next 10 to 11 days and then, on the 15th day of the trade, price drops enough to have the tenkan sen cross below the kijun sen at point D. This is our exit signal, since Ichimoku is telling us that the sentiment has changed, so we close our order at 1.6014 at point E for a total gain of over 96 pips.


Figure II - Tenkan Sen/Kijun Sen Cross Case Study

For maximum risk management on this trade, we also could have moved our stop-loss up with price once price was a conservative distance away from our entry. One option for doing this would be to move the stop-loss up with the kumo, keeping it just below the bottom edge. For even tighter risk management, we could have moved our stop-loss with the kijun sen, keeping it 5 to 10 pips below that line as it moved up.

Bollinger Band

Thursday, April 22, 2010
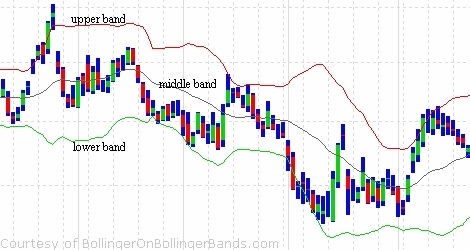
Bollinger Bands are a tool of technical analysis which was invented by John Bollinger in the 1980s. Having evolved from the concept of trading bands, Bollinger Bands are an indicator that allows users to compare volatility and relative price levels over a period time. Basically, this tool provides a relative definition of high and low. By definition prices are high at the upper band and low at the lower band. This definition can aid in rigorous pattern recognition and is useful in comparing price action to the action of indicators to arrive at systematic trading decisions. When the market is calm, the Bollinger Band lines get closer together and when the market was changing Bollinger Band line expand. The indicator consists of three bands designed to encompass the majority of a security's price action:
  1. A simple moving average in the middle
  2. An upper band (SMA plus 2 standard deviations)
  3. A lower band (SMA minus 2 standard deviations)

Standard deviation is a statistical unit of measure that provides a good assessment of a price plot's volatility. Using the standard deviation ensures that the bands will react quickly to price movements and reflect periods of high and low volatility. Sharp price increases (or decreases), and hence volatility, will lead to a widening of the bands.

In order to use the system effectively, you will need to know a great deal about how it works and understand each component.  You may be able to read and learn from a book yourself.  Others may need to have that class instruction atmosphere to fully understand the way this system works however.  While this system is steady, the way people use it can determine how it works.  There are several ways to deal with the Bollinger Band technical indicator.  You can use these rules to help you get started.

Relativity

The first thing to remember is that the  only provides a relative definition of both high and low.  You can take the definition and compare price action and indicator action, but only at relative levels.  You can use these findings to make decisions about buying and selling.  Keep in mind that volatility and trend are built into this formula, so you won’t need to deal with them otherwise.

Indicators

You can use the bands with momentum, volume, open interest, and market data in order to gather indicators.  When you do this however, remember that you should not directly relate the indicators to each other.  You can use one indicator that deals with volume and another indicator that deals with open interest at the same time.  However, you cannot use two indicators that deal with volume together.  So, be sure that you understand that only one indicator of each type should be used.  If you don’t follow this rule, the Bollinger Bands will not be accurate.

Price

One thing you can use the Bollinger Bands for is to clarify pure price patterns.  You will be able to see tops and bottoms and momentum shifts in prices.  Price is interesting when gathered using the Bollinger Bands because it goes up the upper band and down the lower band.  You can successfully use the bands to get patterns in price and then act in the best interest of your investment. Using this system can help you make smarter and more profitable investing decisions overall.

The Average

When dealing with the average band, you need to note that the default parameters of 20 periods are simply defaults.  They are not always representing what the actual parameters of the market are.  Your average should always be a detailing of the middle-term trend.  It may not always be the best for crossovers however.  Also be sure to lengthen the number of standard deviations if the average is lengthened.  If the average is shortened, you must shorten the number of standard deviations as well.  You must always keep the average logically consistent for the Bollinger Bands to work as they are intended.

Follow the links to learn more about Bollinger Band:
  • Bollinger on Bollinger Bands
    • Relative Definition of High and Low
    • Chaiken's Innovation
    • Bollinger's Brainstorm
    • Bollinger Bands Features
    • Bollinger Bands Basics
  • An Introduction to Bollinger Band
    • The Basics of Bollinger Bands
    • Construction
    • Interpretation of Bands
    • Squeezes and Bulges
    • Price Action in a Trending Market
    • Price Targets in Ranging Markets
    • Double Bottom
    • Double Top
    • Conclusion
  • How to Trade Using Bollinger Bands
    • Three Main Methodologies for Using Bollinger Band
    • 1-2-3 Formations and Bollinger Band
    • The Golden Key to Successful Bollinger Band Trading
    • Trade Using Bollinger Bands
  • Trading Strategies
    • Gimmee Bar
    • Tales From The Trenches: A Simple Bollinger Band Strategy
    • Inside Day Bollinger Band Turn Trade
    • Two Sets of Bollinger Bands
    • BB Gun
  • Bollinger Band Video
  • Bollinger Band Indicator (for MT4)
Remember that when you are dealing with the Bollinger Bands technical indicator system that what you see is not a signal to buy or sell.  You must take in all the information the Bollinger bands provide in order to make the best investment decision.  While the Bollinger Bands technical indicator system is a great way to take a look at patterns and gain helpful insight, it is not a system you should use to base your entire investing strategy upon.  Investing is something that often has more to do with life than numbers.  When you are investing, be sure that you allow the numbers and calculations to weigh on your decision.  However, be sure that you also listen to yourself and your gut instinct with investing.  Those who listen to their gut instincts often do very well when it comes to investing.  So, trust yourself and let everything simply come as welcomed assistance.

Learn how the Bollinger Band works and how to add it to your own trading routine, and I hope the explanation of the Bollinger Band can give benefit to your trading analysis.

Good luck and Happy trading.

Trade Using Ichimoku Kinko Hyo

The Ichimoku Kinko Hyo Japanese charting technique was developed before World War II with the aim of portraying - in a snapshot - where the price was heading and when was the right time to enter or exit the market. This was all performed without the aid of any other technical analysis technique (or study).

Ichimoku charts have become a popular trading tool in Japan, not only with the equity market, but in the currency, bond, futures, commodity and options markets as well. The technique was published over 30 years ago but has only gained international attention within the 1990's.


Figure 1. Definition of Ichimoku Kinko Hyo

Interpreting the Chart

Now that we have a chaotic chart filled with colorful lines and strange clouds, we need to know how to interpret it. The Ichimoku chart can be used to determine a variety of things. Here is a list of signals and how you can spot them:
  • Strong signals - A strong buy signal occurs when the Tenkan-Sen crosses above the Kijun-Sen from below. A strong sell signal occurs when the opposite occurs. The signals must be above the Kumo.
     
  • Normal signals - A normal buy signal occurs when the Tenkan-Sen crosses above the Kijun-Sen from below. A normal sell signal occurs when the opposite occurs. The signals must be within the Kumo.
     
  • Weak signals - A weak buy signal occurs when the Tenkan-Sen crosses above the Kijun-Sen from below. A weak sell signal occurs when the opposite occurs. The signals must be below the Kumo.
     
  • Overall strength - Strength is shown to be with the sellers if the Chikou Span is below the current price. Strength is shown to be with the buyers when the opposite is true.
     
  • Support/resistance levels - Support and resistance levels are represented by the presence of the Kumo. If the price is entering the Kumo from below, then the price is at a resistance level. If the price is falling into the Kumo, then there is a support level.
     
  • Trends - Trends can be determined by simply looking at where the current price is in relation to the Kumo. If the price stays below the Kumo, then there is a downward trend (bearish). Alternatively, if the price stays above the Kumo, then there is an upward trend (bullish).
The Ichimoku charts give us a rare opportunity to predict buy and sell signals, support and resistance levels, and even false breakouts, all in one easy-to-use technique.


As can be seen from the formulas, Ichimoku is very similar to moving average studies. And like moving averages, buy and sell signals are given with the crossover technique.

A bullish signal is issued when the Tenkan-Sen (orange line) crosses the Kijun-Sen (purple line) from below. Conversely, a bearish signal is issued when the Tenkan-Sen crosses the Kijun-Sen from above.

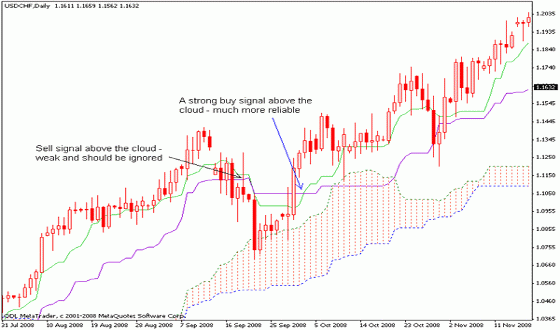
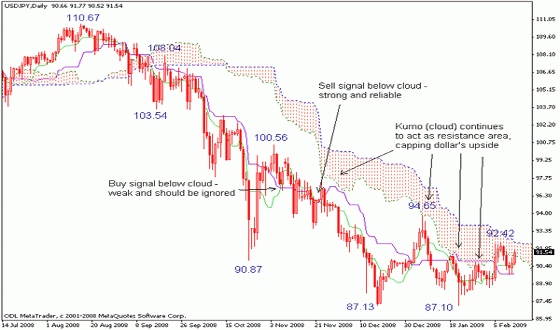
Moreover, there are, in fact, different levels of strengths for the buy and sell signals of an Ichimoku chart. First, if there was a bullish crossover signal and the price, at that time, was trading above the Kumo (or cloud), this would be considered a very strong buy signal. In contrast, if there was a bearish crossover signal and the price, at that time, was trading below the Kumo, this would be considered a very strong sell signal. Secondly, a normal buy or sell signal would be issued if the price was trading within the Kumo when the crossover took place. Thirdly, a weak buy signal would be issued if there was a bullish crossover that occurred while the price was trading below the Kumo. On the other hand, a weak signal would be issued if there was a bearish crossover that occurred when the price was trading above the Kumo.

Another striking feature of the Ichimoku charting technique is the identification of support and resistance levels. These levels can be predicted by the presence of the Kumo. The Kumo can also be used to help identify the prevailing trend of the market. If the price is above the Kumo, the prevailing trend is said to be up. And if the price is below the Kumo, the prevailing trend is said to be down.

A final feature of Ichimoku is the Chikou Span. This line can also be used to determine the strength of the buy or sell signal. If the Chikou Span was below the closing price and a sell signal was issued, then the strength is with the sellers, otherwise it is a weak signal. Conversely, if there was a buy signal and the Chikou Span was above the price, then there is strength to the upside, otherwise it can be considered a weak buy signal. This feature can also be incorporated into the other signals.

Application

Most traditional technical analysis techniques are based on the open, high, low, close or average price. Others may use volatility while fixed scales such as Fibonacci numbers have also been applied. But the results are the same. Support and resistance levels are always depicted as a point or a line.

With Ichimoku charts, it is the Kumo that quantifies support and resistance levels and the Kumo that can be used to project these levels into the future. It's therefore important to note that (unlike its traditional counterparts) the support/resistance level given by the Kumo appears as a layer of varying thickness, with the thickness being related to prior market volatility.

Let's now illustrate the Ichimoku technique with an example.


Figure 2. GBP/USD Daily Chart

Figure 2 is an Ichimoku daily chart of GBP/USD. As can be seen, the price was in a trading range for about two months between September and October 2004, trading below the Kumo which acted as a resistance level. A weak buy signal (one red up arrow) followed by a strong sell signal (three blue down arrows) and then another weak buy signal occurred during this period. After the last buy signal, the price subsequently pierced through the Kumo and an upside breakout followed.

Then in January 2005, the price retraced from its highs and traded within the Kumo for about a month without any direction. The price then surged back above the Kumo and as can be seen, the future support and resistance level from March 2005 onwards can be quantified. With Ichimoku theory, only when the price trades below this level can the uptrend be considered over.

Let's now combine Ichimoku with traditional support and resistance theory: previous highs and lows will act as support and/or resistance in the future.


Figure 3. USD/JPY Daily Chart

Figure 3 is an Ichimoku daily chart of USD/JPY. Between August and October 2004, the price was in a trading range within the Kumo, which acted as a support level. At point A, the price tested the bottom of the Kumo and this support level held. Afterwards, the price traded around this level before it surged temporarily higher but failed to create new highs. Soon after, the price retested the low (point B) made by point A. This coincided with a break below the Kumo which has since narrowed (i.e. lower volatility) and soon afterwards a huge downtrend commenced once the previous lows were taken out.

In general, the thickness of the Kumo can be related to strength of the current support/resistance level. A thin Kumo implies the current volatility of the market has lessened and the price has been narrowed into a range that a strong breakout to either side is imminent. On the other hand, a thick Kumo implies a strong support/resistance level coupled with high volatility.

Short-term/Long-term Implications

One might wonder then what implications Ichimoku has regarding short-term versus long-term trading. One general application is that by comparing a daily and a weekly chart, a price channel can be identified.
This can be illustrated with the USD/JPY weekly chart in Figure 4.
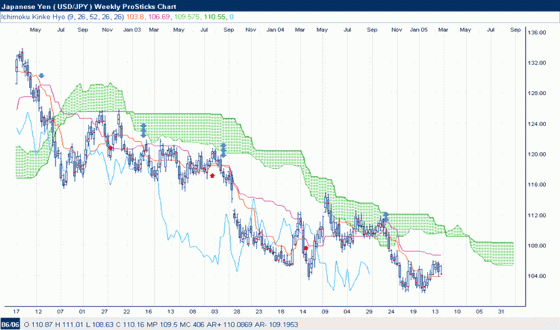

Figure 4. USD/JPY Weekly Chart

One can quickly observe that the price has been trading below the Kumo on a weekly basis for the past two and a half years. Comparing this with the daily chart in Figure 3, one can see that the price drop in October 2004 coincided with the price hitting a strong weekly resistance level.

So by comparing Ichimoku charts of different time frame, one can gauge where support and resistance levels exist and then better position oneself in the market.

This article only scratches the surface of this wonderful charting technique and as more charting applications provide this tool for traders, we believe that most traders will not want to trade without it.

Ichimoku Cloud Filters Information Storm

The Ichimoku Kinko Hyo or equilibrium chart isolate higher probability trades in the forex market. It is new to the mainstream, but has been rising incrementally in popularity among novice and experienced traders. More known for its applications in the futures and equities forums, the Ichimoku displays a clearer picture because it shows more data points, which provide a more reliable price action. The application offers multiple tests and combines three indicators into one chart, allowing the trader to make the most informed decision. Learn how the Ichimoku works and how to add it to your own trading routine.
Getting to Know Ichimoku

Essentially made up of four major components, the application offers the trader key insight into forex market price action. First, we'll take a look at both the Tenkan Sen and Kijun Sen.

Tenkan Sen and Kijun Sen

What the trader will want to do here is use the crossover to initiate the position. Looking at our example in Figure 1, we see a clear crossover of the Tenkan Sen (black line) and the Kijun Sen (red line) at point X. This decline simply means that near-term prices are dipping below the longer term price trend, signaling a down trending move lower.


Figure 1 - A crossover in similar Western branded fashion

Now let's take a look at the most important component, the Ichimoku "cloud", which represents current and historical price action. It behaves in much the same way as simple support and resistance by creating formative barriers. The last two components of the Ichimoku application are:

Senkou Span A and Senkou Span B

The space between the Senkou Span A and Senkou Span B is known as the Kumo. Kumo later became known as the 'Ichimoku Cloud' since the most characteristic feature of the indicator is the  Kumo (cloud), which is designed to represent various levels of support and resistance. In developing the cloud, Hosada realized support/resistance levels were not single lines drawn in the sand, since traders were often placing their trades at various distances from the support levels. Thus, since support was many layers deep from the offers/bids around the level, he created a cloud to represent the past levels of support/resistance.

The most basic theory of this indicator is that if the price is above the cloud, the overall trend is bullish while below the cloud is bearish, and in the cloud is non-biased or unclear. Lastly, when the price is above the cloud, then the top of the cloud will act as a general support level, and when price is below, the cloud base will act as resistance.

But remember the cloud has thickness, and thus resistance does as well, which by making these thicker reduces the risk of a false breakout. One more thing is that the thickness of the Kumo (cloud) also indicates the market volatility. A thin layer of cloud implies the current volatility is low whilst a thick cloud implies increasing volatility.

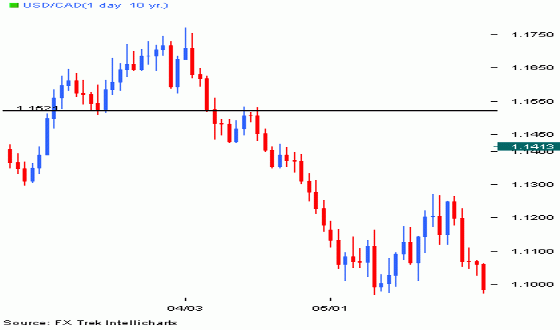
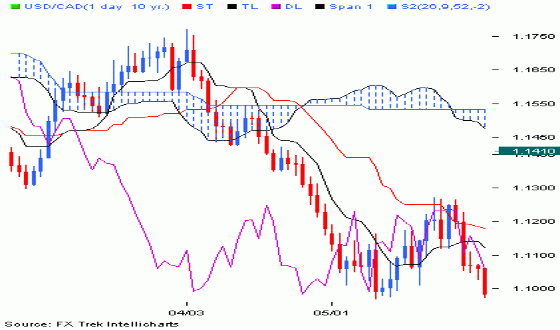
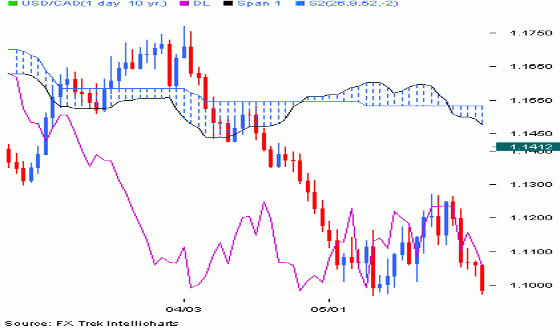
Let's take a look Figure 2's comparison. Taking our USD/CAD example, we see a comparable difference between the two. Although we see a clear support at 1.1522 in our more standard chart (Figure 2), we subsequently see a retest of the level. At this point, some trades probably will be stopped out as the price action comes back against the level, which is somewhat concerning for even the most advanced trader. However, in our Ichimoku example (Figure 3), the cloud serves as an excellent filter. Taking the volatility and apparent take back into, the cloud suggests a better trade opportunity on a break of the 1.1450 figure. Here, the price action does not trade back, keeping the trade in the overall downtrend momentum.


Figure 2 – Classic support and resistance break
  

Figure 3 – Ichimoku creates a better break opportunity

Chikou span

This feature suggests the market's sentiment by showing the prevailing trend as it relates to current price momentum. The interpretation is simple: as sellers dominate the market, the Chikou span will hover below the price trend while the opposite occurs on the buy side. When a pair remains bid in the market or is bought up, the span will rise and hover above the price action.


Figure 4 – Chikou helps to sort out market sentiment

Putting it All Together

Like everything else, there's no better substitute for learning but through application. Let's break down the best method of trading the Ichimoku cloud technique.

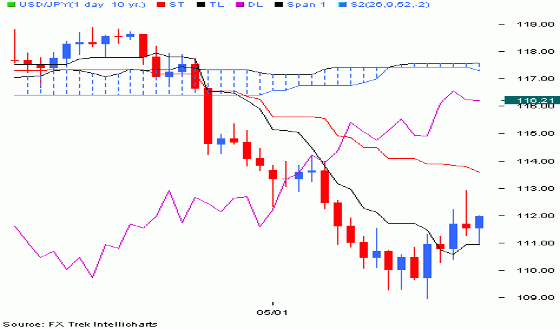
Taking our U.S. dollar/Japanese yen example in Figure 4, we will zoom in on a more recent scenario in Figure 5.

Figure 5 – Lines that tell a complete story

With the currency pair fluctuating in a range between 116 and 119 figures for the beginning of the year, traders were anxious to see a break out of the persistent range. Here, the cloud is a product of the range-bound scenario over the first four months and stands as a significant support/resistance barrier. With that established, we look to the Tenkan and Kijun Sen. As mentioned before, these two act as a moving average crossover with the Tenkan representing a more short-term moving average and the Kijun acting as the base line. As a result, the Tenkan dips below the Kijun, signaling a decline in price action. However, with the crossover occurring within the cloud at Point A in Figure 5, the signal remains unclear and will need to be clear of the cloud before an entry can be considered. We can also confirm the bearish sentiment through the Chikou Span, which at this point remains below the price action. Conversely, if the Chikou was above the price action, it would confirm bullish sentiment. Putting it all together, we are now looking for a short position in our U.S. dollar/Japanese yen currency pair.


Figure 6 – Place the entry ever so slightly in the cloud barrier.

Because we are equating the cloud to a support/resistance barrier, we will want to see a close of the session below the cloud before initiating any type of short sell position. As a result, we will be entering at Point B on our chart. Here, we have a confirmed break of the cloud as the price action stalls on a support level at 114.56. The trader, at this point, can opt to place the entry at the support figure of 114.56 or place the order one point below the low of the session. Placing the order one point below would act as confirmation that the momentum is still in place for another move lower. Subsequently, we place the stop just above the high of the candle within the cloud formation. In this example, it would be at Point C or 116.65. The price action should not trade above this price if the momentum remains. Therefore, we have an entry at 114.22 and a corresponding stop at 116.65, leaving our risk out at 243 pips. In keeping with sound money management, the trade will have to have a minimum of a 1:1 risk/reward ratio with a preferable 1:2 risk/reward for legitimate opportunities. In our example, we will maintain a 1:2 risk/reward ratio as the price moves lower to hit a low of 108.96 before pulling back. This equates to roughly 500 pips and a 1:2 risk to reward - a profitable opportunity. One key note to remember: notice how the Ichimoku is applied to longer time frames, in this instance the daily. With the volatility in shorter time frames, the application will tend not to work as well as with many technical indicators.

To Recap:
  1. Refer To The Kijun / Tenkan Cross - The potential crossover in both lines will act in similar fashion to the more recognized moving average crossover. This technical occurrence is great for isolating moves in the price action.
     
  2. Confirm Down / Uptrend With Chikou - Confirming that the market sentiment is in line with the crossover will increase the probability of the trade as it acts in similar fashion with a momentum oscillator.
     
  3. Price Action Should Break Through The Cloud - The impending down/uptrend should make a clear break through of the cloud of resistance/support. This decision will increase the probability of the trade working in the trader's favor.
     
  4. Follow Money Management When Placing Entries - By adhering to strict money management rules, the trader will be able to balance risk/reward ratios and control the position.
The Round Up

This indicator is intimidating at first, but once the Ichimoku chart is broken down, every trader from novice to advanced will find the application helpful. Not only does it mesh three indicators into one, but it also offers a more filtered approach to the price action for the currency trader. Additionally, this approach will not only increase the probability of the trade in the forex markets, but will assist in isolating only the true momentum plays. This is opposed to riskier trades where the position has a chance of trading back former profits.

A Glance at an Equilibrium Chart

First of all, the Japanese word "Ichimoku" means "one glance", "Kinko" means "balance / equilibrium and "Hyo" means "chart", in short Ichimoku Kinko Hyo means to see the equilibrium at a glance. Basically, the indicator is best used to define market trend, support and resistance and finally generate buy/sell signals.

The names of mathematicians and statisticians dominate the list of technical analysis innovators; it's not often we see newspaper writers on this list, but Tokyo newspaper writer Goichi Hosoda is an exception to the rule. In the years before World War II, Hosoda—with the help of several assistants—developed the Ichimoku Kinko Hyo, or "equilibrium chart at a glance technique".

Released in 1968, the technique was designed to illustrate where prices were likely to go and when to trade. In this article, we look at this extraordinary technique and how you can apply it to enhance your trading. The Ichimoku charting technique did not gain international attention until the 1990s. It has since been applied by traders worldwide.

Constructing an Ichimoku Chart

Let's see what these lines represent, and how they are plotted:

  1. Tenkan-Sen (Conversion Line) -  Red
  2. Kijun-Sen (Base Line)  - Blue
  3. Chikou Span (Lagging Span)  - Green
  4. Senkou Span A - Orange
  5. Senkou Span B - Grey
The Kumo (known as the cloud), is the space between Senkou Span A and Senkou Span B.

Ichimoku uses three key time periods for its input parameters: 9, 26, and 52. The time frame is most often measured in days; however, Ichimoku can be modified to be any time frame as long as it is consistent throughout all calculations.

We should note that, when Ichimoku was created in the 1930s, a trading week was 6 days long. These parameters, thus, represent one and a half week, one month, and two months. Now that the trading week is 5 days, one may want to modify the parameters to 7, 22, and 44.

Ichimoku Analysis in Trading

First, let's take a look at an Ichimoku chart so we have a visual point of reference.


Tenkan Sen and Kijun Sen

Tenkan Sen and Kijun Sen are quite similar to moving average studies, buy and sell signals are generated when short-term line (Tenkan-Sen) crossover the longer-term line (Kijun-Sen).

A buy signal is generated when the Tenkan-Sen crosses above the Kijun-Sen from below. On the other hand, a sell signal is generated when the Tenkan-Sen crosses below the Kijun-Sen from above. However, one clear advantage of using Ichimoku Kinko over the moving average crossover is that the area where the Tenkan-Sen crosses the Kijun-Sen will dictate the relative strength of that buy/sell signal.

If a buy signal (i.e. the Tenkan-Sen crosses above the Kijun-Sen from below) happens above the Kumo (or cloud), this would be considered as a very strong buy signal as the cloud is representing support / resistance area.

Similarly, if a sell signal (i.e. the Tenkan-Sen crosses below the Kijun-Sen from above) occurs below the cloud, this would be considered as a very strong sell signal. If the buy/sell signal occurs inside the Kumo, this signal will be treated as normal.

Finally, if the buy signal happens below the cloud, it will be viewed as a weak signal whilst if the sell signal occurs above the cloud, it will be treated as a weak signal also.


Senkou Span A and Senkou Span B

The space between the Senkou Span A and Senkou Span B is known as the Kumo (or the cloud). The Kumo is getting more popular among chartists to identify support and resistance area. When price is trading above the Kumo, the prevailing trend is said to be up and the Kumo will be treated as the support area whilst
if price is below the Kumo, the trend is said to be down and the cloud will become resistance area instead.

If the price is below the Kumo, the lower line (i.e. the Senkou Span A) acts as the first resistance level, and the upper line (i.e. Senkou Span B) becomes the second resistance level.

If the price is above the cloud, its upper line (i.e. the Senkou Span A) acts the first support level, and the lower line (i.e. the Senkou Span B) becomes the second support level.

One more thing is that the thickness of the Kumo also indicates the market volatility. A thin layer of cloud implies the current volatility is low whilst a thick cloud implies increasing volatility.


Chikou Span

The Chikou Span originally is used to indicate the relative strength of the buy/sell signals generated by Tenkan-Sen and Kijun-Sen, if the buy signal happens above the Chikou Span, it will be treated as a strong signal and vice versa. However, in our approach, we prefer and remove the Chikou Span (which leave a chart a bit more clear) and simply use the other 4 lines.

Why isn't Everyone Making Money?

The technique gives traders an easy way to determine buy and sell signals, support and resistance levels, trends, and signal strength. However, the charting method is not without its drawbacks, such as its need for empirical decision making and time period definitions, and its indications to make high frequency trades.
  • Empirical decision making – As with most technical analysis, empirical decision making is required when determining the time period to use. Keep in mind that the time periods are the only thing making this technique different from a moving average analysis, so it is critical to fine-tune (optimize).
     
  • 24-hour markets – Markets which operate 24 hours a day, like the currency market, are without an actual set open and close price. To get around the problem, traders often make the calculations in real-time or use the open and close times that are closely associated with the currency pair being traded. For example, for the EUR/USD, it would be wise to use the New York open and close since that is when the majority of trading occurs.
     
  • Occasional short time between trades – There will be times when the buy and sell signals occur within close proximity. In a world without commissions or bid/ask spreads, this would not be a problem; however, quick trades like this can cause commissions to eat into your profits.
Despite these flaws, the technique is employed often by the international trading community, and can prove to be an asset to any trader.

Conclusion

Most traditional technical analysis techniques are based on the open, high, low, close or average price. Others may use volatility while fixed scales such as Fibonacci numbers have also been applied. But the results are the same. Support and resistance levels are always depicted as a point or a line.

Trend Trading

Definition
"Trend following is an investment strategy that takes advantage of long-term moves that play out in various markets... Traders who use this approach can use current market price calculation, moving averages and channel breakouts to determine the general direction of the market and to generate trade signals. This approach is reactive, diversified, long-term, and systematic by nature. Traders who subscribe to a trend following strategy do not aim to forecast or predict markets or price levels; they simply jump on the trend and ride it."
- Definition of trend following from Wikipedia
Ichimoku Kinko Hyo and Trend Trading

It must be understood by any who wishes to use the power of Ichimoku Kinko Hyo that it is, first and foremost, a trend trading system. It is further assumed that the trader wielding Ichimoku does so with a solid understanding of the basic tenets of trend trading. This is a key assumption, since knowledge of how to trade the trend is absolutely critical to long-term success with Ichimoku. Ichimoku on its own will not teach one the underlying philosophy of trend following, so we must make a special mental note at this point regarding the key factors involved in successful trend trading.

Trend traders:
  • NEVER attempt to predict where the market will go
     
  • NEVER attempt to pick "tops" and "bottoms" of price action
     
  • ALWAYS respect the trend and align their trades accordingly
     
  • Let the market tell them when the trend is finished, not their "intuition"
     
  • Realize that they will necessarily sacrifice some pips at the beginning and end of a trend as they wait for confirmation that the trend beginning and end are authentic
     
  • Look at price action from a long-term perspective and don't get shaken by volatility
     
  • Understand that they will go through some potentially significant but temporary periods of drawdown as the trend matures
     
  • Understand that trend trading can lead to large gains but also equally large losses
     
  • Understand that trends can take place on multiple time frames
Profitable trend trading is 99% mental. If one can conquer their mind and quell the inevitable inner dialogue that screams "Whoa! Looks like price is going against your position! The trend must be ending - SELL NOW!!" and keep their eyes on the long term, they stand an excellent chance at being a successful, happy and stress-free trend trader. However, if they cannot turn off this inner dialogue or at least ignore it and keep their focus on the long-term, then they are in for a very short, very bumpy ride as a Forex trader.

As a charting system that is purpose-built for trend trading, Ichimoku Kinko Hyo can provide the savvy practitioner with a much deeper view of the trend and therefore, more secure entry and exit signals than any other trend trading system available. Nevertheless, it must be combined with the proper mindset in order to be used to its full potential.

Before a trader can trade effectively on the chart, a basic understanding of the components that make up the equilibrium chart need to be established. Created and revealed in 1968, the Ichimoku was developed in a manner unlike most other technical indicators and chart applications. Usually formulated by statisticians or mathematicians in the industry, the indicator was constructed by a Tokyo newspaper writer named Goichi Hosoda and a handful of assistants running multiple calculations.

What they came up with is now used by many Japanese trading rooms because it offers multiple tests on the price action, creating higher probability trades. Although many traders are intimidated by the abundance of lines drawn when the chart is actually applied, the components can be easily translated into more commonly accepted indicators.

Flat Top/Bottom Kumos

Monday, April 19, 2010
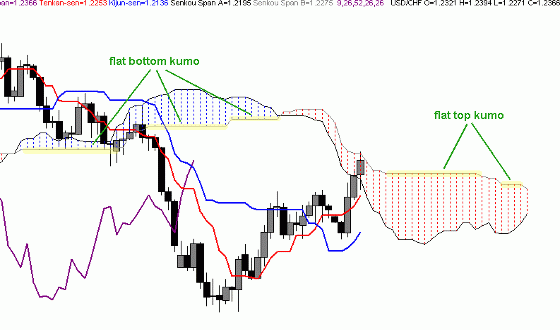
The flat top or bottom that is often observed in the kumo is key to understanding one piece of the kumo's "equilibrium equation". Just like the "rubber band effect" that a flat kijun sen can exert on price, a flat senkou span B can act in the same way, attracting price that is in close proximity. The reason for this is simple: a flat senkou span B represents the midpoint of a trendless price situation over the prior 52 periods - price equilibrium. Since price always seeks to return to equilibrium, and the flat senkou span B is such a strong expression of this equilibrium, it becomes an equally strong attractor of price.

In a bullish trend, this flat senkou span B will result in a flat bottom kumo and in a bearish trend it will manifest as a flat top kumo. The Ichimoku practitioner can use this knowledge of the physics of the flat senkou span B in order to be more cautious about both their exits out of the kumo. For instance, when exiting a flat bottom (bullish) kumo from the bottom, rather than merely placing an entry order 10 pips below the senkou span B, savvy Ichimoku practitioners will look for another point around which to build their entry order to ensure they don't get caught in the flat bottom's "gravitational pull". This method minimizes the number of false breakouts experienced by the trader.

See the highlighted areas in the chart for Figure V below for an example of flat top and bottom kumos:


Figure V - Flat Top and Flat Bottom Kumos

Kumo Sentiment

In addition to providing a view of sentiment vis-a-vis its relationship with price, the kumo itself also has its own "internal" sentiment or bias. This makes sense when we consider that the kumo is made up of essentially two moving averages, the senkou span A and the senkou span B. When the senkou span A is above the senkou span B, the sentiment is bullish since the faster moving average is trading above the slower. Conversely, when the senkou span B is above the senkou span A, the sentiment is bearish.

This concept of kumo sentiment can be seen in Figure IV below:


Figure IV - Kumo Sentiment

When the senkou span A and B switch places this indicates an overall trend change from this longer-term perspective. Ichimoku practitioners thus keep an eye on the leading kumo's sentiment for clues about both current trend as well as any upcoming trend changes. The "senkou span cross" is an actual trading strategy that utilizes this kumo twist as both an entry as well as a continuation or confirmation signal. More on this strategy is covered in our Ichimoku Trading Strategies section.

Kumo Depth

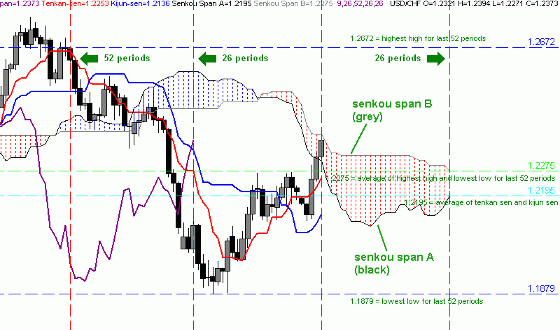
As you will see upon studying an Ichimoku chart, the kumo's depth or thickness can vary drastically. The depth of the kumo is an indication of market volatility, with a thicker kumo indicating higher historical volatility and a thinner one indicating lower volatility. To understand this phenomenon, we need to keep in mind what the two lines that make up the kumo, the senkou span A and the senkou span B, represent. The senkou span A measures the average of the tenkan sen and kijun sen, so its "period" is between 9 and 26 periods, since those are the two periods that the Tenkan Sen and Kijun Sen measure, respectively. The senkou span B line, on the other hand, measures the average of the highest high and lowest low price for the past 52 periods. Thus, the Senkou Span A is essentially the "faster" line of the two, since it measures a shorter period of equilibrium.

Consider the chart in Figure III below. For the previous 52 periods, price made a total range of 793 pips (from a high of 1.2672 to a low of 1.1879) The midpoint or average of this range is 1.2275 and that is thus the value of the senkou span B. This value is then time-shifted forwards by 26 periods so that it stays in front of current price action. The senkou span A is more reactive to short-term price action and thus is already reflecting the move of price back up from its low of 1.1879 in its positive angle and the gradually thinning kumo. The senkou span B, on the other hand, is actually continuing to move down as the highest high of the last 52 periods continues to lower as it follows the price curve's move down from the original high of 1.2672. If price continues to rise, the senkou span A and B will switch places and the senkou span A will cross above the senkou span B in a so-called "kumo twist".


Figure III - The Kumo and its Calculations

The kumo expands and contracts based on market volatility. With greater volatility (i.e. where the price of a given currency pair changes direction dramatically over a short period of time), the faster senkou span A will travel along in relative uniformity with the price curve while the slower senkou span B will lag significantly given that it represents the average of the highest high and lowest low over the past 52 periods. Thicker kumos are thus created when volatility increases and thinner ones are created when volatility decreases.
Kumo depth or thickness is a function of price volatility
From a trading perspective, the thicker the kumo, the greater support/resistance it will provide. This information can be used by the Ichimoku practitioner to fine tune their risk management and trading strategy. For example, they may consider increasing their position size if their Long entry is just above a particularly thick kumo, as the chances of price breaking back below the kumo is significantly less than if the kumo were very thin. In addition, if they are already in a position and price is approaching a very well-developed kumo on another time frame, they may choose to either take profit at the kumo boundary or at least reduce their position size to account for the risk associated with the thicker kumo.
In general, the thicker and more well-developed a kumo is, the greater the support/resistance it will provide.

Price's Relationship to the Kumo

In its most basic interpretation, when price is trading above the kumo, that is a bullish signal since it indicates current price is higher than the historical average. Likewise, if price is trading below the kumo, that indicates that bearish sentiment is stronger. If price is trading within the kumo, that indicates a loss of trend since the space between the kumo boundaries is the ultimate expression of equilibrium or stasis. The informed Ichimoku practitioner will normally first consult price's relationship to the kumo in order to get their initial view on a chart's sentiment. From a trading perspective, the Ichimoku chartist will also always wait for price to situate itself on the correct side of the kumo (above for long trades and below for short trades) on their chosen execution time frame before initiating any trades. If price is trading within the kumo, then they will wait to make any trades until it closes above/below the kumo.

A Better Measure of Support and Resistance

As mentioned earlier, one of the kumo's most unique aspects is its ability to provide a more reliable view of support and resistance than that provided by other charting systems. Rather than providing a single level for S/R, the kumo expands and contracts with historical price action to give a multi-dimensional view of support and resistance. At times the kumo's ability to forecast support and resistance is nothing short of eerie, as can be seen in the chart below (Figure I) for USD/CAD, where price respected the kumo boundaries on five separate occasions over a 30-day span.


Figure I - Kumo Support and Resistance

The power of the kumo becomes even more evident when we compare traditional support and resistance theory to Ichimoku's more comprehensive view of support and resistance via the kumo.

In the chart for Figure II below, we have added a traditional down trendline (A) and a traditional resistance line at 1.1867 (B). Price managed to break and close above both the down trendline and the single resistance level at point C. Traditional S&R traders would take this as a strong signal to go Long this pair at that point. A savvy Ichimoku practitioner, on the other hand, would take one look at price's location just below the bottom edge of the kumo and would know that going long at that point is extremely risky given the strong resistance presented by the kumo. Indeed, price did bounce off of the kumo and dropped approximately 250 pips, which would have most likely eradicated the long position of the traditional S/R trader.

Frustrated by his last losing trade, the traditional S&R trader spots another chance to go long, as he sees price break and close above the prior swing high at point D. The Ichimoku trader only sees price trading in the middle of the kumo, which he knows is a trendless area that makes for uncertain conditions. The Ichimoku trader is also aware that the top boundary of the kumo, the senkou span B, is close at hand and may present considerable resistance, so he again leaves this dubious long trade to the traditional S/R trader as he awaits a better trade opportunity. Lo and behold, after meeting the kumo boundary and making a meager 50 pips, the pair drops like a stone nearly 500 pips.

The example given above illustrates how Ichimoku's multi-dimensional view of support and resistance gives the Ichimoku practitioner an "inside view" of S/R that traditional chartists do not have. This enables the Ichimoku practitioner to select only the most legitimate, high reward trade opportunities and reject those of dubious quality and reward. The traditional chartist is left to "hope" that their latest breakout trade doesn't turn into a head fake - a shaky strategy, at best.


Figure II - Traditional S/R Theory vs. Ichimoku Kumo

The Basics

The kumo is the very "heart and soul" of the Ichimoku Kinko Hyo charting system. Perhaps the most immediately visible component of Ichimoku, the kumo ("cloud" in Japanese) enables one to immediately distinguish the prevailing "big picture" trend and price's relationship to that trend. The kumo is also one of the most unique aspects of Ichimoku Kinko Hyo as it provides a deep, multi-dimensional view of support and resistance as opposed to just a single, uni-dimensional level as provided by other charting systems. This more encompassing view better represents the way in which the market truly functions, where support and resistance is not merely a single point on a chart, but rather areas that expand and contract depending upon market dynamics.

The kumo itself is comprised of two lines, the senkou span A and the senkou span B. Each of these two lines provides its own measure of equilibrium and together they form the complete view of longer-term support and resistance. Between these two lines lies the kumo "cloud" itself, which is essentially a space of "no trend" where price equilibrium can make price action unpredictable and volatile.
Trading within the kumo is not a recommended practice, as its trendless nature creates a high degree of uncertainty.

Senkou Span B

The senkou span B is calculated in the following manner:
SENKOU SPAN B ("2nd leading line")

(HIGHEST HIGH + LOWEST LOW) /2 for the past 52 periods time-shifted forwards (into the future) 26 periods
The senkou span B is best-known for its part, along with the senkou span A line, in forming the kumo, or "Ichimoku cloud" that is the foundation of the Ichimoku Kinko Hyo charting system. On its own, the senkou span B line represents the longest-term view of equilibrium in the Ichimoku Kinko Hyo system. Rather than considering only the last 26 periods in its calculation like the senkou span A, the senkou span B measures the average of the highest high and lowest low for the past 52 periods. It then takes that measure and time-shifts it forward by 26 periods, just like the senkou span A. In Hosoda's original implementation, the senkou span B would thus represent price equilibrium for the prior two (2) month period, shifted ahead of current price by one (1) month. This convention allows Ichimoku practitioners to see this longer term measure of equilibrium ahead of current price action, allowing them to make informed trading decisions.

Senkou Span A

The senkou span A is calculated in the following manner:
SENKOU SPAN A ("1st leading line")

(TENKAN SEN + KIJUN SEN)/2 time-shifted forwards (into the future) 26 periods
The senkou span A is best-known for its part, along with the senkou span B line, in forming the kumo, or "Ichimoku cloud" that is the foundation of the Ichimoku Kinko Hyo charting system. The senkou span A is another one of the time-shifted lines that are unique to Ichimoku. In this case, it is shifted forwards by 26 periods. Since it represents the average of the tenkan sen and kijun sen, the senkou span A is itself a measure of equilibrium. Goichi Hosoda knew well that price tends to respect prior support and resistance levels, so by time-shifting this line forward by 26 periods he allowed the Ichimoku practitioner to quickly see "at a glance" where support and resistance from 26 periods ago (1 month ago on a Daily chart) reside compared with current price action.

While it is possible to trade off of the senkou span A and B lines on their own, their real power comes in their combined dynamics in the kumo.

Chikou Span

The chikou span is calculated in the following manner:
CHIKOU SPAN ("lagging line")

CURRENT CLOSING PRICE time-shifted backwards (into the past) 26 periods
The chikou span represents one of Ichimoku's most unique features; that of time-shifting certain lines backwards or forwards in order to gain a clearer perspective of price action. In the chikou span's case, the current closing price is time-shifted backwards by 26 periods. While the rationale behind this may at first appear confusing, it becomes very clear once we consider that it allows us to quickly see how today's price action compares to the price action of 26 periods ago, which can help determine trend direction.

If the current close price (as depicted by the chikou span) is lower than the price of 26 periods ago, that would indicate that there is a potential for more bearish price action to come, since price tends to follow trends. Conversely, if the current closing price is above the price of 26 periods ago, that would then indicate the possibility for more bullish price action to follow.

Consider the charts in Figures IV and V below:


Figure IV - Chikou Span in Bullish Configuration
  
 
Figure V - Chikou Span in Bearish Configuration

In addition to providing us with another piece of the "trend puzzle", the chikou span also provides clear levels of support and resistance, given that it represents prior closing prices. Ichimoku practitioners can thus draw horizontal lines across the points created by the chikou span to see these key levels and utilize them in their analysis and trading decisions (see Figure VI below).


Figure VI - Chikou Span Support and Resistance Levels

Kijun Sen

The kijun sen is calculated in the following manner:
KIJUN SEN ("standard line")

(HIGHEST HIGH + LOWEST LOW) /2 for the past 26 periods
The kijun sen is one of the true "workhorses" of Ichimoku Kinko Hyo and it has myriad applications. Like its brother, the tenkan sen, the kijun sen measures the average of price's highest high and lowest low, though it does so over a longer time frame of 26 periods as opposed to the tenkan sen's 9 periods. The tenkan sen thus provides us with all the information the tenkan sen does, just on a longer time frame.

Due to the longer time period it measures, the kijun sen is a more reliable indicator of short-term price sentiment, strength and equilibrium than the tenkan sen. If price has been ranging, then the kijun sen will reflect the vertical midpoint of that range (price equilibrium) via its flat aspect. Once price exceeds either the last highest high or lowest low within the last 26 periods, however, the kijun sen will reflect that by either angling up or down, respectively. Thus, short-term trend can be measured by the direction of the kijun sen. In addition, the relative angle of the kijun sen will indicate the strength or momentum of the trend.

Price equilibrium is expressed even more accurately in the kijun sen than in the tenkan sen, given the longer period of time it considers. Thus, the kijun sen can be relied upon as a significant level of price support and resistance (see highlighted areas in Figure II below).


Figure II - Kijun Sen Support

Price tends to move alternately away from and back toward the kijun sen in a cyclical fashion due to the kijun sen's strong expression of equilibrium or stasis. Thus, when price momentum is extreme and price moves rapidly up or down over a short period of time, a certain "rubber band" effect can be observed on price by the kijun sen, attracting price back towards itself and bringing it back to equilibrium. An analogy could be made between how price interacts with the kijun sen and how electricity always seeks to return to ground or zero potential. The "ground" in this case is the kijun sen and price will always seek to return to that level. This phenomenon is particularly evident when the kijun sen is flat or trendless, as can be seen in Figure III below:


Figure III - Kijun Sen "Rubber Band" Effect

Given the dynamics of the kijun sen outlined above, traders can use the kijun sen effectively as both a low-risk point of entry as well as a solid stop loss. These two tactics are employed extensively in both the kijun sen cross as well as the tenkan sen/kijun sen cross strategies which are covered in greater detail in our Ichimoku Trading Strategies section.

Tenkan Sen

The tenkan sen, as we have already mentioned in our Introduction section, is calculated in the following manner:
TENKAN SEN ("turning line")

(HIGHEST HIGH + LOWEST LOW) /2 for the past 9 periods
While many may compare the tenkan sen to a simple 9 period simple moving average (SMA), it is quite different in the sense that it measures the average of price's highest high and lowest low for the last 9 periods. Hosoda believed that using the average of price extremes over a given period of time was a better measure of equilibrium than merely using an average of the closing price. This study of the tenkan sen will provide us with our first foray into the key aspect of equilibrium that is so prevalent in the Ichimoku Kinko Hyo charting system.

Consider the chart in Figure I below:


Figure I - Tenkan Sen vs. 9 Period SMA

As can be seen in the chart, the tenkan sen often exhibits "flattening" whereas the 9 period SMA does not. This is due to the fact that the tenkan sen uses the average of the highest high and lowest low rather than an average of the closing price. Thus, during periods of price ranging, the tenkan sen will clearly show the midpoint of the range via its flat aspect.
When the tenkan sen is flat, it essentially indicates a trendless condition over the last 9 periods.
It can also be seen how the tenkan sen provides a much more accurate level of price support than does the 9 period SMA. With only one exception, price action stayed above the tenkan sen in the three highlighted areas of the chart, while price broke below the SMA numerous times. This is due to the more conservative manner in which the tenkan sen is calculated, which makes it less reactive to small movements in price. On a bearish chart, the tenkan sen will likewise act as a level of resistance.

The angle of the tenkan sen can also give us an idea of the relative momentum of price movements over the last 9 periods. A steeply angled tenkan sen will indicate a nearly vertical price rise over a short period of time or strong momentum, whereas a flatter tenkan sen will indicate lower momentum or no momentum over that same time period.

The tenkan sen and the kijun sen both measure the shorter-term trend. Of the two, the tenkan sen is the "fastest" given that it measures trend over the past 9 periods as opposed to the kijun sen's 26 periods. Thus, given the very short term nature of the tenkan sen, it is not as reliable an indicator of trend as many other components of Ichimoku. Nevertheless, price breaching the tenkan sen can give an early indication of a trend change, though, like all Ichimoku signals, this should be confirmed by the other Ichimoku components before making any trading decision.

One of the primary uses of the tenkan sen is vis-à-vis its relation to the kijun sen. If the tenkan sen is above the kijun sen, then that is a bullish signal. Likewise, if the tenkan sen is below the kijun sen, then that is bearish. The crossover of these two lines is actually a trading signal on its own, at topic that is covered in more detail in our Ichimoku Trading Strategies section.

An Introduction to Ichimoku (2)

Sunday, April 18, 2010
Ichimoku Components
The Ichimoku chart is composed of five separate indicator lines. These lines work together to form the complete "Ichimoku picture". A summary of how each line is calculated is outlined below:
TENKAN SEN ("turning line")
(HIGHEST HIGH + LOWEST LOW)/2 for the past 9 periods.
KIJUN SEN ("standard line")
(HIGHEST HIGH + LOWEST LOW)/2 for the past 26 periods.
CHIKOU SPAN ("lagging line")
CURRENT CLOSING PRICE time-shifted backwards (into the past) 26 periods.
SENKOU SPAN A ("1st leading line")
(TENKAN SEN + KIJUN SEN)/2 time-shifted forwards (into the future) 26 periods.
SENKOU SPAN B ("2nd leading line")
(HIGHEST HIGH + LOWEST LOW)/2 for the past 52 periods time-shifted forwards (into the future) 26 periods.
The chart below provides a visual representation of each of these five components:


Ichimoku Components

The senkou span A and B deserve special mention here as they, together, form the Ichimoku kumo (or cloud). We cover the kumo and its myriad functions in more detail in the section "The Kumo".

Kumo = Cloud = Area between Senkou Span A and B
Ichimoku Settings
As you can see in the Ichimoku Components section above, each line calculation has one and sometimes two different settings based on the number of periods considered. After much research and backtesting, Goichi Hosoda finally determined that the settings of 9, 26 and 52 were the ideal settings for obtaining optimum results with Ichimoku. He derived the number 26 from what was then the standard Japanese business month (which included Saturdays). The number 9 represents a week and a half and the number 52 represents two months.
The standard settings for an Ichimoku Kinko Hyo chart are 9, 26, 52.
There is some debate around whether or not these settings of 9,26,52 are still valid given that the standard work month here in the West does not include Saturdays. In addition, in non-centralized markets that do not keep standard business hours like the Forex (which trades around the clock) some have posited that there may be more appropriate settings. Nevertheless, most other professional Ichimoku traders, agree that the standard settings of 9,26,52 work extremely well and do not need to be altered.
The argument could be made that, since Ichimoku Kinko Hyo functions as a finely-tuned, integrated whole, changing the settings to something other than the standard could throw the system out of balance and introduce invalid signals.
Ichimoku uses three key time periods for its input parameters: 9, 26, and 52. When Ichimoku was created in the 1930's, a trading week was 6 days long. These parameters, thus, represent one and a half week, one month, and two months, respectively. Now that the trading week is 5 days, one may want to modify the parameters to 7, 22, and 44.

Thus, for the purposes of describing Ichimoku Kinko Hyo within this article, it will be assumed that the standard settings are being used.